Introduction To Microsoft Power point
Microsoft PowerPoint feature and function
This lecture will provide a hands-on experience of Microsoft PowerPoint. It is a software package used to display information in the form of a slide show. A slide show is a presentation of a series of still images on a projection screen or electronic display device, typically in a prearranged sequence. Some basic features and functions of MS PowerPoint, which are mostly used for creating slideshow presentations, shall be taught and practiced.
The lab will teach students to prepare different presentations by:
- Using different slide layouts and inserting multiple slides in a slide show
- Inserting text and drawing, just as you have been taught in Lab 01
- Creating and formatting tables
- Inserting pictures, headers/footers, word art,
- Drawing various diagrams, using built-in shapes
- Using different design options, such as slide orientation, themes,
- Adding Transitions to slides and setting style and timing of each transition
- Adding Animation to the slides
As a pre-lab activity, read Chapters1B and 10 from the book (Introduction to Computers by Peter Norton, 6th edition (2013), McGraw Hill) to gain an insight about computer software.
Introduction
PowerPoint presentations consist of a number of individual pages or “slides”. The “slide” analogy is a reference to the slide projector. Slides may contain text, graphics, sound, movies, and other objects, which may be arranged freely. The presentation can be printed, displayed live on a computer, or navigated through at the command of the presenter. For larger audiences the computer display is often a video projector. Slides can also form the basis of webcasts.
PowerPoint provides three types of movements:
- Entrance, emphasis, and exit of elements on a slide itself are controlled by what PowerPoint calls Custom
- Transitions, on the other hand, are movements between These can be animated in a variety of ways.
- Custom animation can be used to create small story boards by animating pictures to enter, exit or
Activity 1
Start MS PowerPoint.
Solution
- Click the Start button
- Click on Microsoft Office PowerPoint on the Programs If you don’t see it there, go to Microsoft Office group first.
- Once you run the program, you will get a new window on the right side of the screen with several Each section has different options.
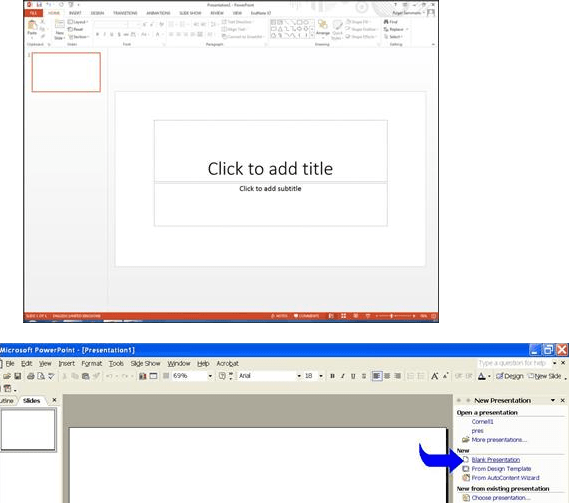
The main part of the screen is divided into two sections. The main section shows the current slide, while on the left, slide miniatures appear, allowing you to see the current slide in its context.
In the top left corner of the screen is the Quick Access Toolbar which contains icons to common commands, e.g. save and undo. Below this is the Ribbon, with tabs along the top. Each tab has a set of icons which are used to give instructions to PowerPoint. Currently the HOME tab is displayed.
At the very bottom of the window, is the Status Bar. This shows various information, e.g. which slide you are currently looking at (here you are on slide 1) and the language you’re working in. On the right-hand side of the Status Bar are icons to change the view of the slides and to zoom in or out.
Activity 2
Use Design themes.
Solution
If you are creating a new presentation:
You could use a template different from the ones given to you by default. We go to the website http://office.microsoft.com/en-us/templates/ and search for the Template. Fireworks (Equivalent of Theme Fireworks in the new version of PowerPoint). Of the several search results that you obtain, click and download the one for PowerPoint 2003 (It is compatible with 2010). If there is a problem, read the instructions on how to manually download it, and the need for uncompressing the file. Remember the location where you saved it, because you need to go back to it. The file will have a fileextension of POT.
- In the Design section, left click on the bottom arrow on the right of the Themes . Select “Browse for Themes”, and look in the folder where you placed the Fireworks Select it
- You can search for a different theme, also known as template on the same website, to use it for your
If you want to apply a template to an existing presentation:
- Open the presentation to which you want to apply the
- Click the Design option on the main The Apply Design Template box opens at the right side of your screen with the small version of the templates.
- Click on the Template you wish to use for your
Activity 3
View the PowerPoint window.
Solution
When you open a presentation or create a new one you will see four main areas on the screen:
- Slides /Outline Tab: it is located on the left hand side of the
a. If you click the Outline tab
- It will display your presentation text in the form of an outline, without the
- It is easy to move text on or among slides by dragging text to reorder the information
b. If you click the Slides tab
- It will display the slides of your presentation as small images, called thumbnails.
- You can quickly navigate through the slides in your presentation using this
- You can also add, delete, or rearrange slides on this
- Slide Pane: it is located at the center of the screen, next to the Outline pane. It containsthe current slide of your presentation, where the cursor is. The slide will display the text, graphics and background
- Notes Pane: it is located right below the Slide This pane allows you to typespeaker notes for your reference. They are used as reminders you want to make during the presentation, though they are not visible to the audience.
- Task Pane: The Task Pane is a docked window within thePowerPoint interfacethat provides more options than normal dialog boxes. The Task Pane is not always If you want it to appear, click on the Insert menu, and then in the Clip Art item.
At the bottom right corner, there is a set of buttons , collectively called View buttons. These buttons allow you to quickly switch between PowerPoint views. They are (from left to right):
- Normal View button: it displays the standard size for the Outline, Slide and Notes
- Slide Sorter View button: it displays a smaller version of all your slides. If you havemore slides that what you actually see on the screen, you can scroll down to see the You see neither the Outline nor the Notes panes.
- Slide Show button: it starts your presentation. You will see your slides one by one, withslide transitions, special effects, video, and audio clips if you included any of
Activity 4:
Save the presentation.
Solution:
- Go to the File menu and click Save As. Select a “PowerPoint Presentation”
- In the File name textbox, type the name that you want to give to your
- Click on the Save in list arrow and select the storage device where you want to save your
- In the Save as type the extension pptx will Click on the Save button.
NOTE: If you want to save an existing presentation you will use SAVE, unless you want to save it under a different name. Then you will use the SAVE AS option.
Activity 5:
Close presentation and exit the program.
Solution:
- Click on the File menu and select the Close
- Click Yes, if necessary (if you want to save your work)
- Click on the Microsoft Office button and select the Exit PowerPoint Microsoft PowerPoint will terminate.
Activity 6:
Enter slide text on a slide.
Solution:
- When you have a new slide, you will see something like “Click to add title” or “Click to add text”. Move the mouse pointer to that
- Click on that The insertion point, a blinking vertical line, indicates where your text will appear in the title or text placeholder.
- When you finish typing, click outside the
- Or you can go to the Insert Menu, and select Text Box. Place the cursor where you want to insert the text, and make your
Activity 7:
Create a new slide.
Solution:
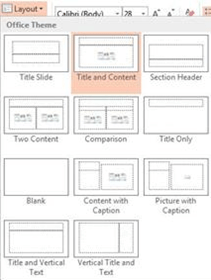
- Click the New Slide button on the Home Choose the Layout of your slide among the different layout schemes that appear when you click on Layout.
- Each layout will display the layout’s name (E.g. Title and Content).
- Click on the desired For example: Title and Content, and select Clip Art.
Activity 8:
Work in Outline view.
Solution:
- Whenever you see the slide icon in the Outline pane, it means that whatever text you see or type next to it represents the slide’s title.
- On the Paragraph section of the main menu, you will find among all the buttons, theIncrease Indent and Decrease Indent buttons. They look like this:
- Decrease Indent: If it is enabled, you can move an item up the For example if you have the following outline:
- Games
- WarCraft II
- Decrease Indent: If it is enabled, you can move an item up the For example if you have the following outline:
- Diablo II
- System Shock
If you select item i, then click Decrease Indent, would make the outline look like this:
- Games
- WarCraft II
- Diablo II
- System Shock
- Increase Indent: If it is enabled, you can move an item down the Forexample if you have the following:
- Hardware
- Software
- Application Software
- System Software
If you select items 3 and 4 and click the Increase Indent button, the outline would look like this:
- Hardware
- Software
- Application Software
- System Software
Activity 9:
Enter Notes for slides.
Solution
- Go to the slide, where you want to have a
- Click in the Notes The Notes pane is at the bottom of the screen, below the slides pane.
- Type the notes that you wish to use as a reminder
- Click outside the Notes pane area to
Activity 10
View your presentation.
Solution
There are three view choices in PowerPoint: Normal, Slide Sorter, and Slide Show View. You can access these views under the View Menu at top or by clicking on the view icons at the bottom of the screen
- NormalView: This is the main work window. In this view you can easily edit your slide, create a background color, insert a picture, format a picture, insert text and/or format text.
- Slide Sorter View:This view shows thumbnails of every slide in your presentation, like a light You can move slides around (click once and highlight, then drag), delete slides and choose where to add new slides.
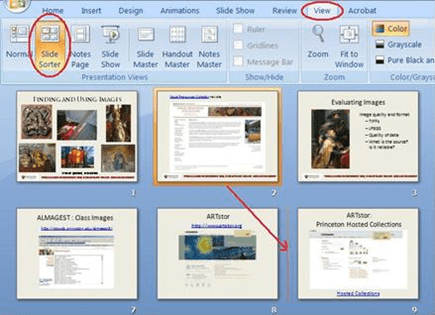
In the Slide Sorter view, click once the slide to select/ highlight it. Then drag and release where you want your slide to go. You will see a thin line appear as you move your cursor—this indicates where the slide will appear when you release your mouse button. You can also do this in the left sidebar of the Normal View.
- Slide Show View:In the Slide Show tab, you can see different options for viewing the slides e.g. you can view presentation from the start or from the current slide.You can view your slides just as they will appear during a To view the whole show from the beginning, you can also use Slide Show View show from the top toolbar. If you select this (instead of the toolbar icon), you will see a small triangular tool in the lower left. Click on this and it will give you other options. One nice option is Pointer Options. This allows you to use a pen or pointer tool as you show your presentation.
Activity 11:
Add a background to your slide.
Solution:
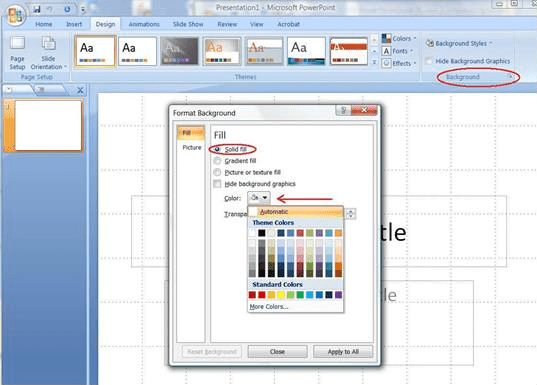
- From the Design menu on top toolbar click Background.
- In the Format Background dialogue box click on the pull down color menu to see your color options.
- Black is recommended for the Choose a color or click on More Colors. If you want to apply this color to the background of ALL YOUR SLIDES click Apply to all.
Activity 12:
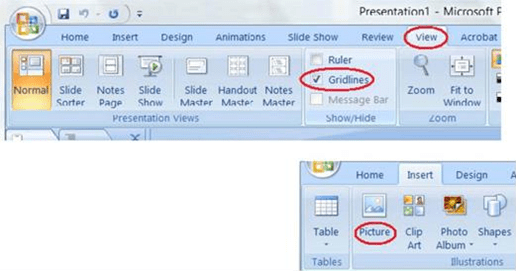
Add a grid display to your working view. Insert a picture to the grid. Adjust the picture (size, position, adjustment).
Solution:
- Go to View
- Check box for
- Click the Insert tab, click Picture.
- Browse to find picture and select
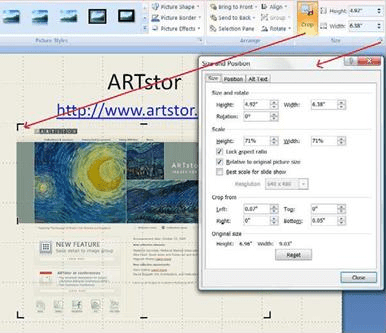
- Size of picture: Select your picture by clicking on it You will see the circular “handle bars” outlining the image. To enlarge or make the image smaller, simply position your mouse over a corner circle. It will change to a double- headed arrow; click and drag. Always use a “corner” handle and drag diagonally. This will maintain the aspect ratio of the image and not distort it.
- Position on slide: Make sure your object is selected (the “handle bars” should be showing). When you move your cursor into the center of the image, it will turn into a 4- headed arrow. Now you can move the entire image around on your slide- simply click and drag the picture to the desired location. You can also use your keyboard arrow keys to move the object up and down and side to side.
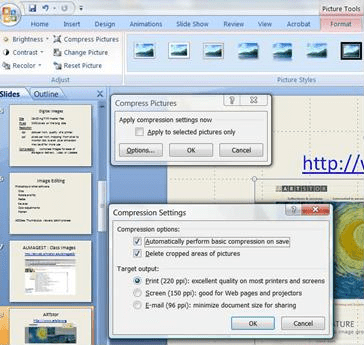
- Picture Tools: Select the picture to see the Picture Tools Click Picture Tools to see options.

In the “Adjust” box you can choose to make changes to your images such as brightness, contrast and color.This is also where the “Compress” function is found. Use Compress to reduce the size and resolution of an image and of your presentation. For details, click the help icon and search “Reduce file size of a picture”.
Cropping reduces the picture by removing part of the image at an edge. You can crop by clicking crop on the Picture Tools Ribbon and using the Crop handles that appear. You can also crop to a specific size or rotate the picture by clicking the arrow at the lower right corner of the size box on the ribbon to get the size dialog box.
Activity 13:
Add text; format it.
Solution:
- Select Insert tab and click Text Box.
- Click where you want your text box and the box will appear. Grab a corner to resize the You can resize and move the box after you have added your text.
- Highlight the text. On the Home Tab, Select font and size and color. Other options are also found here. When your text box is active, you can click on the Drawing Tools Tab for more options.
Activity 14:
Add a hyperlink.
Solution:
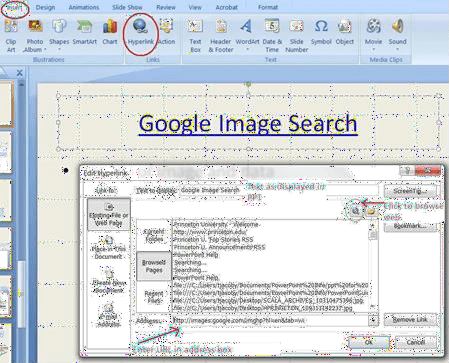
A Hyperlink allows you to connect to another slide, a web page or a file.
- Select the text or object that you want to use as
- On the insert tab, select Hyperlink.
- In the hyperlink dialog box you can click the Browse the Web.icon or just fill in the url in the address box. It is wise to copy and paste long urls to avoid typos. Always test your hyperlinks in your
Activity 15:
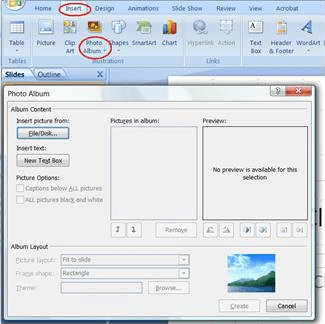
For acquiring a folder of images, use photo album feature.
Solution:
This allows you to take a whole folder of images and bring them all in at the same time, correctly sized.
- Go to the Insert tab, and select Photo Album.
- Select “File/ Disk” button and locate the file folder which you want to import. Open the folder and select all the items (click on them using mouse and the shift key). Now click on the Insert Select (highlight) images and click “Insert” button. You should now see the dialog box.
- Make sure “Fit to slide” is selected in the Picture layout box, and click on the Create button. You will now have one slide for each image file, sized to the slide.
- To change all the backgrounds to black, simply follow the steps outlined above for Add a Background (color) to Your Slide and “Apply to all”.
Activity 16:
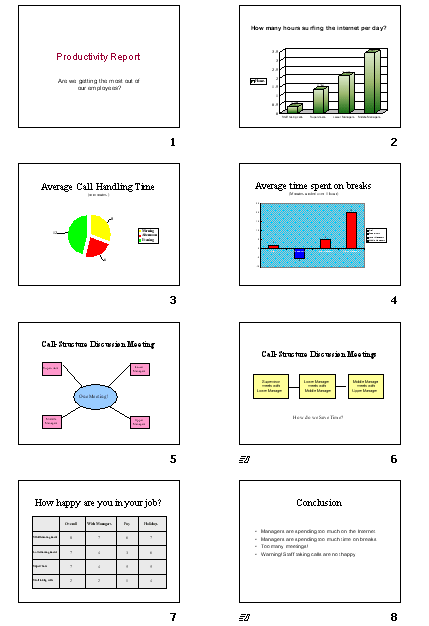
Create following two slides by following the above activities.

Now create following four slides (starting from left to right, then downwards) in the same way, choosing the correct layout as you proceed.
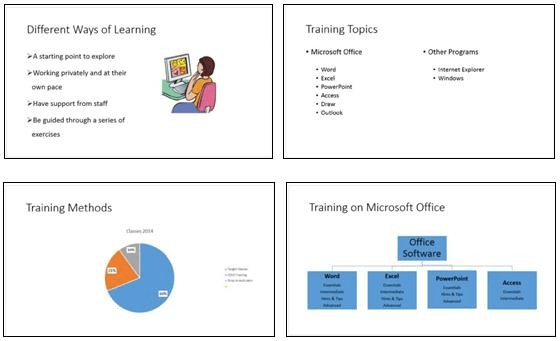
Solution:
- Create first two slides as you created slides in previous
- For slide 3, right click on slide miniature in the left pane and choose Duplicate Modify the text.
- On slide 4, a Two Content slide layout is used. In each content box, there are some sub-bullet points: One below Microsoft Office and second under Other For this, type the main list item, press Enter to add a new main bullet point. Press Tab or click on the Increase list levelbutton to set a sublevel bullet. Type in the required text and press Enter. Repeat.
- For slide 5, a Tile and Content layout is used. In the content box, click onInsert Chart icon or use Insert Chart icon in the Insert tab to choose a pie The original date in the pie chart was changed through the table that appears, and the Quick Layout button on the Chart Tools Design tab was used to get percentages.
- On slide 6, a Tile and Content layout is An organization chart is produced.
- In the content box, click on theInsert SmartArt Graphic icon or from the Insert tab, choose the same .
- Within the Choose a SmartArt Graphic window, click on Hierarchy on the left
- Select the first Organization Chart layout on the right and click [OK]
- Enter the information that you want in the boxes – to add/cut boxes or shapes, right click on them then choose the appropriate option from the shortcut menu (you can also <Delete> them)
Remember to save the latest version of your presentation – press <Ctrl+S>. At this point, it’s also worth doing a spell check on your presentation – to do this, move to the REVIEW tab and then click on the [Spelling and Grammar] button on the left.
Activity 17:
Use guides, gridlines and rulers again.
Solution:
When creating your slides, the placeholders have largely been left in their default positions. Often, people move them around slightly, usually to cram extra information onto a slide. This isn’t good practice – not only do you end up with too much on a slide but the consistency of layout is lost. If you do need to do this then it’s better to do so on the Master Slide (see later) but it also helps if you display the Rulers and Guides. To do this:
- Right click on a slide and choose Ruler – a ruler appears at the top and left
- Right click again and this time choose Grid and Guide – the following dialog box appears:
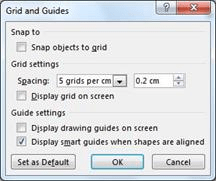
- Turn on Display grid on screen and Display drawing guides on screen – press <Enter> for [OK]
The guides are the lines which split the slide exactly into quarters, while the default grid is shown by dotted lines 2cm square. Each dot represents 0.4cm. Objects are lined up with the grid; to see this:
- Click on the Title placeholder (Training on Microsoft Office) on slide 6 then press <Esc>
- Use the arrow keys to move the placeholder Note: If you have Snap objects to grid turned on, each key press moves it 0.2cm (a grid setting) exactly
- Move the placeholder back to its original position – or use <Ctrl+z> to [Undo] the changes
- To hide the grid, repeat step 2 then turn off Display grid on screen – press
<Enter> for [OK]
Activity 18:
Delete and Hide slides.
Solution:
It’s easiest to delete slides in Slide Sorter view (though you can also do so in Normal view), especially if you have a lot of slides to deal with:
- Click on the [SlideSorter] button (either on the Status Bar or VIEW tab)
- Click on the slide to be deleted (e.g. slide 4, Training Topics) then press the<Delete> key
- To reinstate the deleted slide (you were just practising), press <Ctrl z> for [Undo]
You might want to temporarily hide a slide – for example, if you are giving the presentation to a different group of people for whom that slide is not appropriate. You could also have extra hidden slides which you could add in if you had plenty of time or if someone asked a particular question during the show. When a slide is hidden it remains within the PowerPoint file, but is not displayed during the presentation. To hide a slide:
- Right click on the slide to be hidden (in Normal View you have to right click on the slide miniature)
- From the shortcut menu choose Hide Slide – you’ll find that the number underneath the slide now has a line through it indicating that it’s hidden
- To show the slide again, just repeat steps 4 and 5
Tip: To display a hidden slide when running a show, press the <h> key on the keyboard or type in the slide number and press <Enter>.
Activity 19:
Instead of simply moving abruptly from one slide to another during a presentation, slide transitions allow slides to dissolve into each other, using a variety of different special effects. These can make your on-screen presentation look even better and more professional. Use different effects in your presentation.
Solution:
- Check you are in Normal view and that the first slide is selected
- Move to the TRANSITIONS tab to see the following ribbon:
Dominating the ribbon is the Transition to This Slide group. As you click on an icon, you’ll see the transition effect on the slide (there is also a down arrow that will show you all the different transition effects in one window). The [Effect Options] button lets you change the direction of the effect. Timing (the group to the right) lets you change the speed of the transition effects.
- Choose one of the transition effects for the first slide (the [down] arrow shows all the effects).Note that a small star symbol appears to the left of the first slide miniature – this indicates that a transition has been setup on this slide. Explore the options.
- Click on [Effect Options] and change the direction of the effect
- Increase the Duration of the transition to slow it down and see the effect more
- You can also set up a Sound: but note that the speakers might have been disabled on the Lab PCs.
- Another useful feature moves on a slide automatically (without you having to click the mouse button):Under Advance Slide, set the next slide to appear After: a set number of seconds
- Move to the next slide and repeat steps 3 to 7, choosing different effects
- Finally save your presentation (press <Ctrl+s>) then run it (<F5>) to see the effects – press <Esc> when you’ve seen enough
Having different transition effects between slides may add interest but it isn’t good practice. It distracts from the talk and isn’t good for accessibility. It’s best to stick to one transition throughout (and only use a different one for effect, if you need to). To standardize the transition:
- Remove the current effects by choosing [None] (the first in the list) then click on [Apply to All]
- Next, choose your preferred transition (repeat steps 3 to 7) then click on [Apply to All]
- Finally, press <F5> to see the effects
Activity 20:
PowerPoint allows information on your slides to appear one item at a time. This stops your audience from reading ahead of you, making them concentrate on each point individually. Try to animate a set of bullet points.
Solution:
- Move to the ANIMATIONS tab then click on a slide with a bulleted list on it (e.g. slide 2)
- Click on the bullet points then move the mouse over the Animations icons and watch the effects
- Click on the [down arrow] at the foot of the Animations scroll bar to see more Try setting up various animations for your slides.
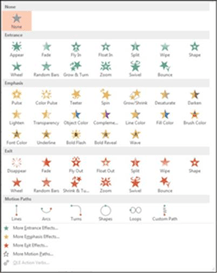
- From the list of animations choose one of them, g.Fade
- Click on [Effect Options] (if active) and see what is available
- Repeat steps 3 to 5 for another slide with bullet points, choosing a different animation
Tip: As with slide transition, it isn’t a good idea to use too many different animations as they can distract the viewer. Always bear accessibility in mind and avoid some of the more ‘exciting’ animations.
To see what you can do with advanced animation:
- Click on the slide title on one of the slides that you’ve already animated
- Next, click on the [Animation Pane] button in the Advanced Animation group to display the task pane
- Click on the [Add Animation] button and choose an Entrance animation
- Click the <▲> button (or on [Move Earlier] in the Timing group) to animate it before the list
- Select the title again and this time [Add Animation] choosing an Emphasis animation
- Repeat step 10 to move it to second in the list
- Click the [Play From] or [Preview] button to view your changes
- Next, try animating the picture, displaying it after the title animations
- Finally, save your presentation (press <Ctrl+s>) then run it from the first slide (press <F5>)
Tip: You can also set up Exit effects and MotionPaths – for example, when the slide is finished, you can get the picture to exit along a particular motion path. This is all done via the [Add Animation] button (as above).
- End by closing the Animation Pane (click on the button or on the [x] at its top right)
Activity 21:
Create a Master slide. Master slides are very important as they control the layout of your whole presentation. They allow you to create your own slide template which is applied to every slide. This is useful if you want to put your own logo, picture or even just your name in the same place on each slide.
Solution:
- Move to the VIEW tab then click on the [Slide Master] icon in the MasterViews
group – a window similar to that below appears:
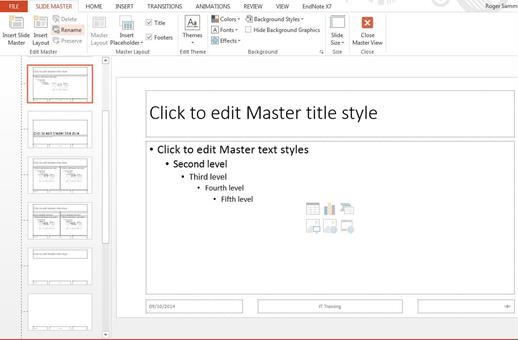
- A Slide Master tab is displayed on the Ribbon indicating that you are in the Slide Master Click on the first (top) slide miniature on the left
This is the Slide Master which is used by all the slides – any changes you make here are applied to the whole presentation. The slide miniatures below are all the usual slide layouts that are available, some of which are being used by certain slides. To make changes just to a specific layout, you make them on that custom layout.
To change the look of all the information at the top/bottom of each slide:
- Select the footer placeholders using the mouse to draw a selection rectangle over the placeholders – hold down the mouse button and drag over them (the rectangle must enclose the placeholders)
- Move to the HOME tab and use buttons in the Font group to change the format, g.font size
- To change any placeholder’s position, click on the edge (or, more easily, click on it then press <Esc>) and use the <arrow_keys> to move it to its new position
- To see the changes to all the slides, move to the SLIDE MASTER tab and [Close Master View]
- Save your presentation – press <Ctrl+s>
Home Activities:
Activity 1:
Create the PowerPoint folder in your flash drive. Run MS PowerPoint. Search and select the template named Serenity Nature.
- Type “Introduction to ICT”, as the title of the Type your name as the subtitle. Press Enter. Type your course code, registration number and section in the line below your name.
- Create a new slide. Its layout should be Tile and Text. In the title section, type CSC 101 – registration number.Type Introduction to ICT in the “Click to Add Text” section (below the slide’s title). It is going to be the first bulleted item.Type your Full Name as the second bulleted Type Fall 2016 as the third bulleted item.
- Create a new slide. Use the same layout that you used previously.Switch to Outline View, by clicking the Outline tab.Type BASIC COMPUTER CONCEPTS, next to the icon that represents slide 3 and pressENTER.Click the Increase Indent button or press Tab and then type, “What is a Computer?” (without the quotes) as the first bulleted Type the following: “It is a device that accepts input, processes data, stores data, and produces output.” (without the quotes) as the second bullet item.In the third bullet, type your full name.
- For the second slide, type in the Notes pane “This definition is based on the concepts presented in Dr. John von Neumann’s ”
- Spell-check your
- Save your work in your flash disk as a PowerPoint Presentation named pptx (you do not need to type .pptx). Save it inside your PowerPoint folder.
Activity 2:
Create slides similar to the following set of slides. Use SmartArt, Chart and Shapes in the Insert tab.
Activity 3:
Animate the slides created in Activity 2 using different advanced animation effects and motion paths.
Activity 4:
Create a Master Slide by using a custom layout:
- Adding a picture or image
- To change the background color, see Changing the Theme below The default font and font sizes for the text and title styles
Assignment:
Deadline: at the start of next Lab.
Make a 15-minute presentation on different Input/Output devices (Chapters 2 and 3 of textbook). Use different effects, animations, transitions and a custom Master Slide.
Note: this should be a formal presentation. Take care of font size, font color, font names, and other styles and animations accordingly.
Related links
Microsoft word Installation of Python List and Tuple in python
Power Point Variable and statement String in python
Microsoft Excel If else statement in python functions in python
Microsoft Access loops in python Ubunto operating system
At Cui tutorial, courses, past papers and final year projects
#tutorial #cui #pastpaper #courses