Introduction To Microsoft Word
Microsoft word feature and function
This article will provide a hands-on experience of Microsoft Word. Some basic features and functions of MS Word, which are mostly used while creating text documents, shall be taught and practiced.
The article teach students to prepare different text documents by:
- Using different font styles, listing, and line and paragraph styles
- Creating and formatting tables
Instructor Note:
As a pre-lab activity, read Chapters1B and 10 from the book (Introduction to Computers by Peter Norton, 6th edition (2013), McGraw Hill) to gain an insight about computer software generally and text processing software, especially.
Introduction
In computing, the term text processing refers to the discipline of mechanizing the creation or manipulation of electronic text. Text usually refers to all the alphanumeric characters specified on the keyboard of the person performing the mechanization. Text processing involves computer commands which invoke content, content changes, and cursor movement, for example to search and replace, format, generate a processed report of the content, or filter a file or report of a text file.
Microsoft Word is word processing software that is used to manipulate a text document, such as a resume or a report. Text is typically entered by typing and the software provides tools for copying, deleting and various types of formatting. Some of the functions of MS Word include creating, editing, saving and printing documents, copying, pasting, moving and deleting text within documents, formatting text such as font type and style, creating and editing tables, inserting elements from other software, such as illustrations or paragraphs and, correcting spelling and grammar.
Activity 1:
Create a new word document, save it on your Desktop and close it.
Solution:
- Start MS
- The screen will display an empty document (New Word file).
- Type the following
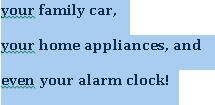
Consider this sentence: “Computers are everywhere.” Does it sound like an overstatement or a cliché? No matter how you perceive the impact of computers, the statement is true. Computers are everywhere. In fact, you can find them in some pretty unlikely places, including your family car, your home appliances, and even your alarm clock!
- To save the file, click on Save button on the top left corner of the screen. You can also use the shortcut keys (Ctrl + S) to save the file. The Save button can also be reached by going to File tab on the top left
- The Save As dialog box will The cursor will be active in file name drop- down box . Type a name for this new file. Name it MyDoc.
- Select Desktop as saving location from left pane of Save As dialog The location bar will now be set to Desktop.
- Left click on the Save button at the right bottom of the dialog Your file is now saved on Desktop.
- Close the file by going to File tab and clicking on Close option .
Activity 2:
Open the file you created in Activity 1. Change the font face and size.
Solution:
- Click on File tab. Select Open . The Open dialog box will
- Set the location of the file you want to open. In this case, your file is located on Desktop. Set Desktop as location from the left pane of dialog The location bar will now be set to Desktop
- Select the file MyDoc from the right pane of the dialog box. The file name will appear in File Name drop-down box .
- Right click on Open. The file will now be displayed on the
- Change the original text to following
Consider this sentence: “COMPUTERS ARE EVERYWHERE.” Does it sound like an overstatement or a cliché? No matter how you perceive the impact of computers, the statement is true. Computers are everywhere. In fact, you can find them in some pretty unlikely places, including your family car, your home appliances, and even your alarm clock!
- To make the above changes, first select C of ‘Consider’ using your mouse. Change its font size to 18 or larger by selecting the size from Font Size option . You can either select the small arrow or type in the desired font size in the
- Font size can be incremented or decremented by using Grow Font (Ctrl+>) and Shrink Font (Ctrl + <) options respectively. You can see shortcut keys for different options by moving cursor over that option.
- Select “Computers are everywhere” using your mouse. Change the font face to Algerian by selecting it from the font face box. You can either use the small arrow or type in font name in the box. Font face will now be selected to Algerian.
- Save the changes by pressing Ctrl+Sor .
Activity 3:
Change the case of the text to lowercase, UPPERCASE and other capitalization options.
CONSIDER this sentence: “COMPUTERS ARE EVERYWHERE.”
Does It Sound Like An Overstatement Or A Cliché? No matter how you perceive the impact of computers, the statement is true. Computers ARE everywhere. In fact, you can find them in some pretty unlikely places, including your family car, your home appliances, and even your alarm clock!
Solution:
- Select ‘Consider’. From the toolbar/ribbon, click on small arrow besides change case option . A list of options will Select toggle case. This will change all lower case letters to upper case and vice versa.
- Select ‘Does it sound like an overstatement or a cliché?’ Click small arrow again to display different case Select . This will change the first letters of all words of this sentence to uppercase.
- Select ‘are’ in the sentence ‘Computers are everywhere.’ Again, click the small arrow and choose option . This will capitalize all letters of the selected
- Check remaining options and see the
- Save the document using or Ctrl+S.
Activity 4:
Use Bold, italics, underline, strike through, superscript and subscript options, and other Font options and make following changes. CONSIDER this sentence: “COMPUTERS ARE EVERYWHERE.” Does It Sound Like An Overstatement Or A Cliché? No matter how you perceive the impact of computers, the statement is true.Computers ARE everywhere. In fact, you can find them in some pretty unlikely places, including your family car, your home appliances, and even your alarm clock!
Solution:
- Using your mouse, select “Computers are everywhere.” Choose underline option from the font You can change different line styles by clicking on the small arrow beside this option. You can alternatively press Ctrl+U for the same.
- Select ‘Does It Sound Like An Overstatement Or A Cliché?’ Choose italics option from the font toolbar. You can perform the same function by pressing Ctrl+I.
- Select ‘consider’. Choose subscript option or press Ctrl+=.
- Select ‘RE’ from ‘ARE’. Choose superscript option or press Ctrl+Shift++
- Select ‘family car’. Choose strikethrough from font
- Select ‘home appliances’. Click on the bold option from the toolbar or press Ctrl+B for bolding it out.
- Select ‘the statement is true.’ Choose highlight option. You can pick a different highlight color by using the down arrow with the
- Select ‘alarm clock!’ using the mouse and right click on Font Color option. You can find a variety of colors by using the down
- If you want to clear all the text formatting, simply click on .
- Save the document using or Ctrl+S.
Activity 5:
Using different paragraph options, write the given paragraph.
Consider this sentence: “computers are everywhere.” Does it sound like
- an overstatement or
- a cliché?
No matter how you perceive the impact of computers, the statement is true. Computers are everywhere. In fact, you can find them in some pretty unlikely places, including
- your family car,
- your home appliances, and
- even your alarm clock!
Solution:
- Create a new MS Word Write the given paragraph as you did in activity 1. Make it bold (Ctrl+B or select ).
Consider this sentence: “Computers are everywhere.” Does it sound like an overstatement or a cliché? No matter how you perceive the impact of computers, the statement is true. Computers are everywhere. In fact, you can find them in some pretty unlikely places, including your family car, your home appliances, and even your alarm clock!
- Place your cursor after ‘like’ in line # Press Enter from keyboard. Now position the cursor after ‘or’ and press Enter. Place the cursor after ‘?’ and press Enter. Select the following lines.
- an overstatement or a cliché
- Select down arrow of Numbering option from Paragraph You will see different numbering styles/formats. Choose the following format.

- Again select the same text. From the paragraph toolbar, click on the down arrow of line and paragraph spacing. You will see different spacing Select. Try using other options too and note the difference.
- Repeat step 2 for ‘your family car, your home appliances, and even your alarm clock!’ to have them in new lines (as shown below). Select the
- Choose Bullets option from the You can change the style of bullets by selecting the down arrow. Re-select the text and change the line and paragraph spacing to 2.5 (as was done in step 4).
Activity 6:
Type-in the following text in either a new word document or an existing one, using different paragraph options.
- Main item #
1.1 Sub-item 1.
1.1.1 Sub-sub-item 1.1.1
1.1.2 Sub-sub-item
1.2 Sub-item 2.
- Main item #
- Main item #
Solution:
- Write ‘ Main item # 1’. Don’t forget to add single space after ‘1.’ by using the spacebar on the keyboard. Press Enter from the keyboard. You will see that numbering automatically starts. You can start numbering in any format, e.g. 1.1./a./ A) etc.
- Add the remaining Main items, i.e. Main item # 2 and Main item # 3 using the same procedure as of Step 1.
- Once you are done with all the Main items, start with sub-items. Place the cursor after ‘Main item # 1’ and press Enter. A new item # 2 will appear. Use backspace key of the keyboard and delete the number Now type ‘1.1. Sub-item 1.1.’ Don’t forget to add a space after ‘1.1.’
- Press Enter. A new numbered item 1.2. will appear on the document. Write ‘Sub- item 2.’ after it.
- Place the cursor after ‘1. Sub-item 1.1.’ Press Enter. Delete 1.2. by using the backspace key from the keyboard. Write ‘1.1.1.’ and press spacebar once. This will add another level of numbering. Write ‘Sub-sub-item 1.1.1.’ in front of 1.1.1.
- Press enter and repeat step 4 for 1.2. item
Activity 7:
Insert different pages in a Word document such as Cover page or a blank page. Cover page is the first page of any document that displays the title, date, author name, organization name, etc. Blank page is a new empty page that is added at the cursor position.
Solution:
- Open MyDoc that was created in activity
- Select the Insert tab from the
- You will see different page options in the Page Select Cover Page option
The down arrow will display different styles of cover pages. Select any format of your choice. A new cover page is now added to the start of your document.
- Edit different text boxes on the cover page, selecting them and filling in the appropriate
- The cursor is at cover Now add a blank page by selecting from the ribbon. A new page will be inserted after cover page.
- Save the
Activity 8:
Insert following tables in the document. Table 1 should be inserted by selecting the matrix from the option and Table 2 should be created by entering the number of rows and columns in the Insert Table dialog box.
| Table 1 | |||
Table 2
| Introduction | To | Information | And | Communication |
| Technologies |
Solution:
- Open an existing document or create a new
- From the Insert tab , select the Table option by clicking on its down arrow. You will see matrix in the form of rows and columns. Roll your mouse over this matrix and different numbers of rows and columns will be Select a matrix of size 3×4.
- A table with fixed cell size will be inserted in the document where the cursor is
- Type in Table 1 in first cell of the
- Write Table2 just below the table and press
- Re-select Table option by clicking its down arrow. Select the option Insert table at the bottom. Insert Table dialog box will appear as given
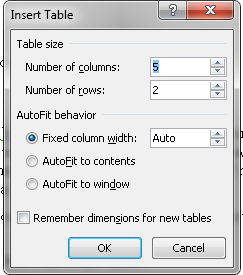
7. Write 5 in Number of columns box and 2 in Number of rows as shown You can set the cell size in AutoFit behavior. Select AutoFit to contents. This will resize cell size as you type-in text. Press OK.
8. A table will be inserted in the document at location where the cursor was placed. Write Introduction to Information and Communication Technologies in different cells (as shown in activity description). You can place cursor from one cell to next by either using mouse or pressing the Tab key on your keyboard.
9. If your roll your cursor over the table, you will see different options to format table by right clicking on.
Home Activities:
Activity 1:
You are required to create your personal letterhead. It must include:
- Your name – use Word Art
- Your address
- Your phone number
- Your email
- Your website URL
- Graphics that pertain to you
The placement/location of the items is up to you. Letterheads must extend no more than 2 inches from the top of the page. Display the ruler bar and adjust the vertical ruler to the top of the page. Save as “letterhead your name”.
Activity 2:
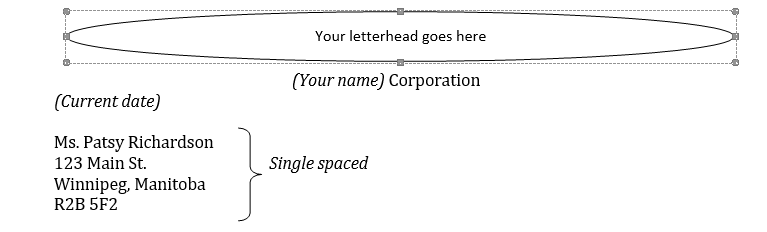
Open the letterhead you created in activity 1. Resave (Save As) and name it “WPexer2 your name.” Type the letter below using the following instructions:
- Center the words “(your name) Corporation”
- Insert the date (do not type it in).
- Richardson’s name and address are single spaced.
- Underline the words “confirmation” and “9 m.”
- Bold the words “no cost”, “November 25th”, “Norseman Inn” and “Cappy’s Capers”
- Put 4 blank lines after “Warmest regards” to allow space for a signature
- Your first and last name are typed at the bottom
- Save
Dear Ms. Richardson
This letter is a confirmation of your request for a ticket to the Annual Fireman’s Ball. Our corporation is happy to provide the ticket to you at no cost.
As you will note from the tickets, the Ball is being held November 25th at the Norseman Inn and will begin promptly at 9 p.m. The famous band, Cappy’s Capers, will provide an entertaining evening of dancing and comedy.
Thank you for allowing our company to be of service to you. Warmest regards,
(Your name)
Activity 3:
Tabs can be left, or right aligned, centered or decimal tabs. All tabs can have dot leaders.
- Type the exercise below down through (to and including) the first
- After you have typed the first paragraph, delete all
(On the Home tab or the Page Layout tab, click the Paragraph dialog box launcher. In the Paragraph dialog box, click Tabs, click Clear all)
- Before you start typing the line “Store # 1…, set the following tabs Left tab 0.5” Centered tab 2” Right tab 3.5” dot leader decimal tab 5.5”
- Type the columns of information on the
- Save your document as “WPtabsA your name”
To: Tom Jennings
From: (your name)
Re: Monthly report of widgets sold to date Date: (use current date)
Tom, the following monthly sales figures seem to indicate that the new item we are offering for sale is taking the market by storm. I would suggest that we continue to advertise as originally planned.
Store#1 ClearWater #A459………………. $356
Store#2 Camrose B375…………………. 205
Activity 4:
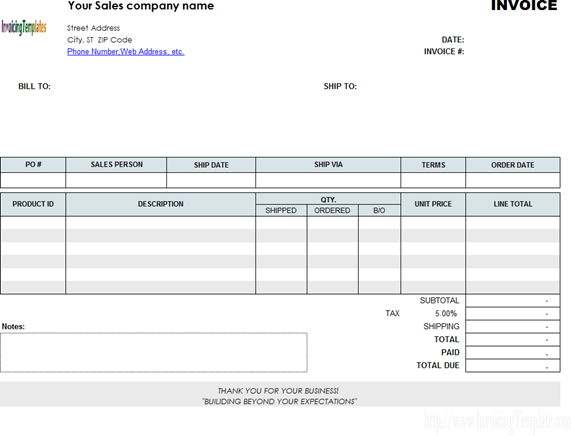
Create a blank invoice table as shown below.
- Use your own name
- Use your own graphics and type of business
- Shade the cells as shown
- Save as “Invoice Table your name”
Assignment:
Deadline: at the start of next lab
Write a paragraph about yourself. Include information about where you’re from, where you went to school, and anything else you feel is appropriate. The format of the paragraph should be left justified, single spaced with Times New Roman 12 pt font (no underline, bold or italics). The paragraph must contain at least 100 words
Lab #2
This lab will learn more features of Microsoft Word. Some basic features and functions of MS Word, which are mostly used while creating text documents, shall be taught and practiced.
The lab will teach students to prepare different text documents by:
- Inserting cover pages, pictures, headers/footers, word art,
- Drawing various diagrams, using built-in shapes
- Using different page layout options
As a pre-lab activity, read Chapters1B and 10 from the book (Introduction to Computers by Peter Norton, 6th edition (2013), McGraw Hill) to gain an insight about computer software, generally, and text processing software, especially.
Introduction
Word processing programs provides tools for creating all kinds of text based documents. Word processors are not limited to working with text; they enable you to add images to your documents and design documents. Using word processors, you can create long documents with separate chapters, table of contents, index and other features. You can also print your documents in customized styles.
Lab Activities:
Activity 1:
Insert a picture to the document. Apply different options to it.
Solution:
- Open an existing Word document or create a
- Place the cursor on a location on the page where the picture should be
In the Insert tab select Picture from the Illustrations ribbon. An Insert Picture dialog box will open.
- Go to the location where the picture is saved in the computer. Select the picture from the right window and select Insert button . You can also click on the down arrow on the button to see different insert
- The selected picture will be inserted to the document where the cursor was
- Click on the Picture Tools tab available on top of the window/screen. Format tab will now be visible, displaying several picture related formatting options.
- Try formatting the picture by applying different styles from the style ribbon
- Add border to the picture by selecting Picture Border’s down-arrow
- Different picture effects can be applied using.
- Insert another picture following same steps; however, this time, try inserting the picture in the middle of a Try different Position and Wrap Text options to the picture and see the difference.
- Select one of the pictures in the Go to Picture Tools and then Formattab. Use the crop feature to crop the picture. Also rotate your picture 90 degrees anticlockwise using either Rotate option in the toolbar or rotating the green circle over the picture using the mouse.
- Save
Activity 2:
Insert drawing canvas and draw the given diagram using different shapes. Group the different shapes used to make one.
Solution:
- Open an existing word document or make a new
- Place the cursor on a location on the page where you want to insert
- From the Insert tab , select Shapes option by clicking its down- A list of different shapes will appear.
- Select Rectangle under Basic Shapes group. Now draw this rectangle, of any size, on the page using
- Now select an arrow from Lines group and draw a line from the lower mid of the rectangle downwards.
- Now select a circle from Basic Shapes group and draw it just below the
- If you want to format any shape, click on the Drawing Tools option will appear on over the toolbar. Select this option and different format options will be available to format the selected shape. Alternatively, you can select a shape and click right on it. Different format options will appear.
- Right click on the drawn rectangle and select Add Text feature . Now write Hello inside Rectangle. You can format text (change color, style, size etc.), as done in previous activities.
- To group all the shapes, click on rectangle first. It is now selected. While keep pressing Ctrl key on your keyboard, move cursor on arrow. An arrow with a plus sign will appear. Select the arrow too. Remember to keep pressing Ctrl key. Now move cursor near the circle. Select it when you see an arrow with a plus. Now all the shapes you have drawn on the canvas have been Relieve the Ctrl key.
- Move mouse over the diagram and see when you get cross arrow . Right click and choose Grouping and then Group All the shapes have now been grouped together to make a diagram. You can now drag/rotate the diagram as a whole.
- Save the documents
Activity 3:
Insert a header, footer, page numbers and a math’s equation (A = 𝜋r2) in a Word file.
Solution:
- Open an already existing
- Go to Insert Click on the down-arrow of Header option in Header & Footer section. A list of header options will appear. Select a header of your choice and you will header on every page of your document.
- The header can be edited and formatted by using different options in Header & Footer Tools . When you are finished, choose close header and footer
- You can insert footer to your document by following the same Click on the footer option in the Insert tab. A list of footer styles will appear. Select one.
- Design the footer by using different features of Header & Footer Once designed, close the header and footer.
- For inserting page numbers, go to Insert tab and select down arrow on Page Different options will appear. Select Top of Page. Then, among different styles, choose one style of your choice.
- Page numbers can be formatted by selecting Format Page Numbers option
. Header & Footer Tools also let writers to format page numbers.
- For inserting the given math’s equation, place the cursor at the appropriate place on page. In the insert tab, there is a Symbols section. Select the down arrow of Equation option. There are many built-in equations.
- Select Area of Circle and that equation will be inserted into the You can edit the equation as well by overwriting with your own variables.
- When the equation is selected, Equation Tools will appear on top of the This will let you format the selected equation by applying different options, such as using different symbols and structures (fraction, script, radical, integral, large operator, bracket, function, limit and log, matrix, etc.).
- Save the document and exit.
Activity 4:
Design the layout of document pages. Apply different themes, setup page, and page background.
Solution:
- Open an existing Word document or make a new Word
- Go to Page Layout tab. On the left-most side of the toolbar, there is a Themes option. Click on its down arrow and choose a theme for your page. This option will change the overall design of the entire document, including colors, fonts and effects.
- You can also customize color, font, or effects under a theme by selecting Colors, Font, and Effects options respectively.
- In the page layout tab, you will find Page Setup section that will enable you to setup page margins, change page orientation (portrait or landscape), page size, and page columns that will split the text into two or more columns. Try applying these options.
- In the same ribbon, you can number every line of your document by using Line Numbers option.
- In the same Page Layout tab, there are various options for designing the background of Watermark option will insert ghosted text behind the content of the page. You can change the color of the page by utilizing the Page Color option. Borders can be inserted too by using the Page Border option.
- Apply these features and save the document
Activity 5:
Write a paragraph and create four copies of the paragraph by copying the text. Insert a page break before each paragraph so that the first page is blank. Insert a line before each paragraph and type a heading line such as “Paragraph 1”, “Paragraph 2”, etc. Set the style of each heading line to be Heading 1.
Solution:
- Left-click three times to highlight the entire
- Write click the selected paragraph and select Copy (or Ctrl-C) followed by Paste (or Ctrl-V) to create copies of a
- Select Insert > Pages> Break > Page Break to insert a page
*****************
- Left-click three times to highlight the heading
- Select “Heading 1” from the main toolbar of Styles on the home
- Repeat step 4 & 5 for all
- Create individual styles for each of the five paragraphs. You are not printing this file, so be creative with colors, animations etc
Activity 6:
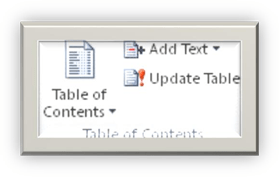
Create, update and remove table of contents.
Solution:
- On the References tab, in the Table of Contents group, click Table of Contents, and then click Insert Table of Contents,
- In the Table of Contents dialog box, do any of the following:
- To change how many heading levels are displayed in the table of contents, enter the number that you want in the box next to Show levels, under
- To change the overall look of your table of contents, click a different format in the Formats list. You can see what your choice looks like in the Print Preview and Web Preview
- To change the type of line that appears between the entry text and the page number, click an option in the Tab leader list.
- To change the way heading levels are displayed in the table of contents, click In the Style dialog box, click the level that you want to change, and then click Modify. In the Modify Style dialog box, you can change the font, the size, and the amount of indentation.
- Repeat step 1 and step 2 for each heading style that you want to include in the table of
- Click
- Choose a table of contents to fit the document type:
- Printed document If you are creating a document that readers will read on a printed page, create a table of contents in which each entry lists both the heading and the page number where the heading appears. Readers can turn to the page that they
Update the table of contents
- If you added or removed headings or other table of contents entries in your document, you can quickly update the table of
- On the References tab, in the Table of Contents group, click Update
- Click Update page numbers only or Update entire
- Delete a table of contents
- On the References tab, in the Table of Contents group, click Table of
- Click Remove Table of
Activity 7:
Insert references.
Solution:
- Click References tab
- Click Manage Sources on the Citations & Bibliography menu
- Either Copy sources from the Master List to the Current List or create New sources that will automatically be added to both the Master and Current List
- Sources in the Current List will be shown in the dropdown Insert Citation list make your
- Enter information for each
- Once all your sources are entered, close the
- Select Style on the Citations & Bibliography menu and choose the appropriate style (typically APA but differs with professor; for Swasy, choose Chicago)
- Click the Bibliography dropdown list and select Insert Bibliography
- The bibliography will appear in your Word
- Edit accordingly (most bibliographies are double spaced)
Activity 8:
Cite references
Solution:
- Click References tab
- Click Insert Citation from the Citations & Bibliography menu and select appropriate source from the dropdown list
- Make sure you have selected the appropriate style from the Style section of the
- Citations & Bibliography menu
Home Activities:
Activity 1:
Draw the figure given below. Use different shapes and group them.
Activity 2:
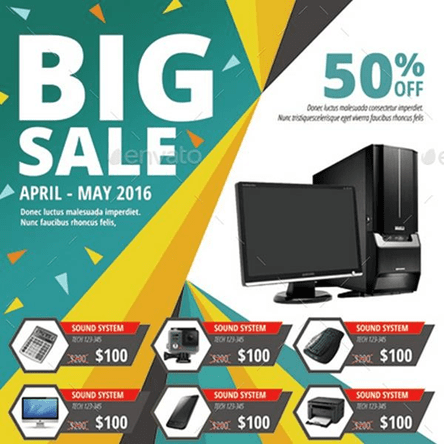
A flyer is a pamphlet, which is a form of paper advertisement intended for wide distribution in a public place, handed out to individuals or sent through the mail. Consider you work at a company. Your boss has asked you to prepare a flyer that advertises company’s major products and/or services.
Two sample flyers are given below.
Lab Task
Create a short report on topic of your choice which includes the following:
• Title page
• Table of Content
• Bibliograpghy and referencing.
• Tables/Figures with captions.
Lab Task
A flyer is a pamphlet, which is a form of paper advertisement intended for wide distribution in a public place, handed out to individuals or sent through the mail. Consider you work at a company. Your boss has asked you to prepare a flyer that advertises company’s major products and/or services.
Assignment:
Deadline: at the start of next lab
Create a short report of 6 pages. Apply the following features:
- Header, Footer
- Headings, sub headings
- Images
- Table of contents
- References (also cite the references)
Related links
Microsoft word Installation of Python List and Tuple in python
Power Point Variable and statement String in python
Microsoft Excel If else statement in python functions in python
Microsoft Access loops in python Ubunto operating system
At Cui tutorial, courses, past papers and final year projects
#tutorial #cui #pastpaper #courses