Introduction to C# Compiler Construction Lab Task
This Lab will provide you an introduction to C# syntax so that you can easily design compiler in C#.
This Lab teaches you the following topics:
- Doing arithmetic operations in C#
- Displaying and retrieving values from DatagridView in C#
- Implementing Stack data structure in C#
Here are some useful links for learning C#
https://cuitutorial.com/courses/web-technology/
Introduction
C# (pronounced as see sharp) is a multi-paradigm programming language encompassing strong typing, imperative, declarative, functional, generic, object-oriented (class-based), and component-oriented programming disciplines. It was developed by Microsoft within its .NET initiative. C# is a general-purpose, object-oriented programming language. Its development team is led by Anders Hejlsberg. The most recent version is C# 6.0 which was released in 2015. C# is intended to be suitable for writing applications for both hosted and embedded systems, ranging from the very large that use sophisticated operating systems, down to the very small having dedicated functions.
Although C# applications are intended to be economical with regard to memory and processing power requirements, the language was not intended to compete directly on performance and size with C or assembly language.
Lab Activities:
Activity 1:
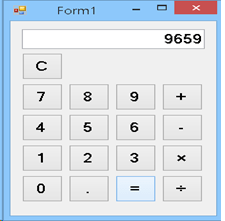
Design a calculator in C# Windows Form Application
Solution:
- Open a Windows Form Application
- Drag some buttons and a textbox from Toolbox onto Form. Example is provided below:
- Copy and paste the code provided below
using System;
using System.Windows.Forms;
namespace RedCell.App.Calculator.Example
{
public partial class Form1 : Form
{
private double accumulator = 0; private char lastOperation;
public Form1()
{
InitializeComponent();
}
private void Operator_Pressed(object sender, EventArgs e)
{
// An operator was pressed; perform the last operation and store the new
operator.
char operation = (sender as Button).Text[0]; if (operation == ‘C’)
{
accumulator = 0;
}
else
{
double currentValue = double.Parse(Display.Text); switch (lastOperation)
{
case ‘+’: accumulator += currentValue; break; case ‘-‘: accumulator -= currentValue; break; case ‘×’: accumulator *= currentValue; break; case ‘÷’: accumulator /= currentValue; break; default: accumulator = currentValue; break;
}
}
lastOperation = operation;
Display.Text = operation == ‘=’ ? accumulator.ToString() : “0”;
}
private void Number_Pressed(object sender, EventArgs e)
{
// Add it to the display.
string number = (sender as Button).Text;
Display.Text = Display.Text == “0” ? number : Display.Text + number;
}
}
}
- There are two kinds of buttons, numbers and operators.
- There is a display that shows entries and
- There is an accumulator variable to store the accumulated
- There is a lastOperation variable to store the last operator, because we won’t evaluate until another operator is pressed.
When a number is pressed, it is added to the end of the number currently on the display. If a 0 was on the display we replace it, just to look nicer.
If the C operator is pressed, we reset the accumulator to 0.
Otherwise we perform the last operation against the accumulator and the currently entered number. If there wasn’t a lastOperation, then we must be starting a new calculation, so we set the accumulator to the currentValue as the first operation.
Activity 2:
Display and retrieve data from data grid view
Solution:
Displaying Data in Data Grid View
- Create a windows Form application
- Drag data grid view tool and a button from toolbox on
- Copy and paste the code provided below behind the
using System; using System.Data;
using System.Windows.Forms; using System.Data.SqlClient;
namespace WindowsApplication1
{
public partial class Form1 : Form
{
public Form1()
{
InitializeComponent();
}
private void button1_Click(object sender, EventArgs e)
{
dataGridView1.ColumnCount = 3;
dataGridView1.Columns[0].Name = “Product ID”;
dataGridView1.Columns[1].Name = “Product Name”;
dataGridView1.Columns[2].Name = “Product Price”;
string[] row = new string[]
{ “1”, “Product 1”, “1000” };
dataGridView1.Rows.Add(row);
row = new string[] { “2”, “Product 2”, “2000” };
dataGridView1.Rows.Add(row);
row = new string[] { “3”, “Product 3”, “3000” };
dataGridView1.Rows.Add(row);
row = new string[] { “4”, “Product 4”, “4000” };
dataGridView1.Rows.Add(row);
}
}
Data Retrieval from Data Grid View
- First populate the data grid view with some data
- You can retrieve data from data grid view via loops
for (int rows = 0; rows < dataGrid.Rows.Count; rows++)
{
for (int col= 0; col < dataGrid.Rows[rows].Cells.Count; col++)
{
string value = dataGrid.Rows[rows].Cells[col].Value.ToString();
}
}
example without using index
foreach (DataGridViewRow row in dataGrid.Rows)
{
foreach (DataGridViewCell cell in row.Cells)
{
string value = cell.Value.ToString();
}
}
Activity 3:
Implement stack data structure
Solution:
using System;
using System.Collections;
namespace CollectionsApplication
{
class Program
{
static void Main(string[] args)
{
Stack st = new Stack();
st.Push(‘A’);
st.Push(‘M’);
st.Push(‘G’);
st.Push(‘W’);
Console.WriteLine(“Current stack: “);
foreach (char c in st)
{
Console.Write(c + ” “);
}
Console.WriteLine();
st.Push(‘V’);
st.Push(‘H’);
Console.WriteLine(“The next poppable value in stack: {0}”, st.Peek()); Console.WriteLine(“Current stack: “);
foreach (char c in st)
{
Console.Write(c + ” “);
}
Console.WriteLine();
Console.WriteLine(“Removing values “); st.Pop();
st.Pop();
st.Pop();
Console.WriteLine(“Current stack: “); foreach (char c in st)
{
Console.Write(c + ” “);
}
}
}
}
When the above code is compiled and executed, it produces the following result:
Current stack:
W G M A
The next poppable value in stack: H Current stack:
H V W G M A
Removing values Current stack: G M A
Home Activities:
Activity 1:
- Implement scientific calculator
Activity 2:
- Insert values into Data grid View at run time
Related Links
- Introduction to C#
- Lexical Analyzer Recognition of operators/variables
- Recognition of keywords/constants
- Lexical Analyzer Input Buffering scheme
- Symbol Table in Compiler Construction
- First set of a given grammar using Array
- Follow set of a given grammar using Array
- Bottom-up Parser-I DFA Implementation
- Bottom-up Parser-II Stack parser using SLR
- Semantic Analyzer
#Compiler Construction complete course # Compiler Construction past paper # Compiler Construction project #Computer Science all courses #University Past Paper #Programming language #Introduction to C# #Lexical Analyzer Recognition of operators/variables #Recognition of keywords/constants #Lexical Analyzer Input Buffering scheme #Symbol Table in Compiler Construction #First set of a given grammar using Array #Follow set of a given grammar using Array #Bottom-up Parser-I DFA Implementation #Bottom-up Parser-II Stack parser using SLR #Semantic Analyzer