List view Builder in Flutter
- The first basic step is to import the required material design package. Let’s import it.
import ‘package:flutter/material.dart’;
2. Create Custom Data Class
In this step, I will create a Company Stocks class that has names and prices of the stocks. It is created only to map the items of the object with the List View Builder.
class CompanyStocks {
String name;
double price;
CompanyStocks({this.name,this.price});
}
3. Create a Stateful Widget
The next step is to create a Stateful Widget that will contain all the dummy data items mapped with the above class. All the logic or the implementation part is done inside the build() method. Copy, and paste the below lines of code.
class MyApp extends StatefulWidget {
@override
_MyAppState createState() {
// TODO: implement createState
return _MyAppState();
}
}
class _MyAppState extends State {
List stocksList = [
CompanyStocks(name: “Facebook”, price: 339.1),
CompanyStocks(name: “A10 NETWORKS INC.”, price: 10.34),
CompanyStocks(name: “Intel Corp”, price: 56.96),
CompanyStocks(name: “HP Inc”, price: 32.43),
CompanyStocks(name: “Advanced Micro Devices Inc.”, price: 77.44),
CompanyStocks(name: “Apple Inc”, price: 133.98),
CompanyStocks(name: “Amazon.com, Inc.”, price: 3505.44),
CompanyStocks(name: “Microsoft Corporation”, price: 265.51),
CompanyStocks(name: “Facebook”, price: 339.1),
CompanyStocks(name: “A10 NETWORKS INC.”, price: 10.34),
CompanyStocks(name: “Intel Corp”, price: 56.96),
CompanyStocks(name: “HP Inc”, price: 32.43),
CompanyStocks(name: “Advanced Micro Devices Inc.”, price: 77.44),
CompanyStocks(name: “Apple Inc”, price: 133.98),
CompanyStocks(name: “Amazon.com, Inc.”, price: 3505.44),
CompanyStocks(name: “Microsoft Corporation”, price: 265.51)
];
@override
Widget build(BuildContext context) {
return MaterialApp(
home: Scaffold(
appBar: AppBar(
title: Text(“List View Builder”),
),
body: ListView.builder(
itemCount: stocksList.length,
itemBuilder: (context, index) {
return Card(
child: Padding(
padding: EdgeInsets.all(10),
child: ListTile(
title: Text(
stocksList[index].name,
style: TextStyle(
fontSize: 20,
),
),
leading: CircleAvatar(
child: Text(
stocksList[index].name[0],
style:
TextStyle(fontSize: 15, fontWeight: FontWeight.bold),
),
),
trailing: Text(“\$ ${stocksList[index].price}”),
),
),
);
},
),
),
);
}
}
Explanation of the Code
In the above code, I have created a Stateful Widget MyApp and overridden the build() method. Inside the state class, I have created dummy data as the list items. It will be of the type Company Stocks that I have created in step 2.
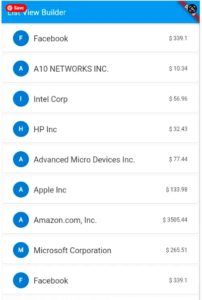
After that, I called the ListView.builder() inside the build method. Inside the builder method, there will be a card and inside the card, there is ListTile that will have three things. It is the Name of the stock, the price of each stock, and the CircularAvtar with the first alphabet of the stock’s name.
Following is the output of the above code.
………..
- Create Model class with the name cataloge.dart and make class and item detail with description like id, name, descr etc
class CatalogModel {
  static final items = [
    Item(
        id: 1,
        name: "iPhone 12 Pro",
        desc: "Apple iPhone 12th generation",
        price: 999,
        color: "#33505a",
        image:
            "https://encrypted-tbn0.gstatic.com/images?q=tbn:ANd9GcRISJ6msIu4AU9_M9ZnJVQVFmfuhfyJjEtbUm3ZK11_8IV9TV25-1uM5wHjiFNwKy99w0mR5Hk&usqp=CAc")
  ];
}

class Item {
  final int id;
  final String name;
  final String desc;
  final num price;
  final String color;
  final String image;

  Item({this.id, this.name, this.desc, this.price, this.color, this.image});
}
2. Then go to home in body section this is catalog app so here in this section we must have list
import 'package:flutter/material.dart';
import 'package:flutter_catalog/models/catalog.dart';
import 'package:flutter_catalog/widgets/drawer.dart';
import 'package:flutter_catalog/widgets/item_widget.dart';

class HomePage extends StatelessWidget {
  final int days = 30;
  final String name = "Codepur";
  @override
  Widget build(BuildContext context) {
    final dummyList = List.generate(20, (index) => CatalogModel.items[0]);
    return Scaffold(
      appBar: AppBar(
        title: Text("Catalog App"),
      ),
      body: Padding(
        padding: const EdgeInsets.all(16.0),
        child: ListView.builder(
          itemCount: dummyList.length,
          itemBuilder: (context, index) {
            return ItemWidget(
              item: dummyList[index],
            );
          },
        ),
      ),
      drawer: MyDrawer(),
    );
  }
}
the item widgets doesnt exist so cr eate under widgets folder with the name item_widgets.dart
and write the folowing code in this file
import 'package:flutter/material.dart';
import 'package:flutter_catalog/models/catalog.dart';

class ItemWidget extends StatelessWidget {
  final Item item;

  const ItemWidget({Key key, @required this.item})
      : assert(item != null),
        super(key: key);

  @override
  Widget build(BuildContext context) {
    return Card(
      child: ListTile(
        onTap: () {
          print("${item.name} pressed");
        },
        leading: Image.network(item.image),
        title: Text(item.name),
        subtitle: Text(item.desc),
        trailing: Text(
          "\${item.price}",
          textScaleFactor: 1.5,
          style: TextStyle(
            color: Colors.deepPurple,
            fontWeight: FontWeight.bold,
          ),
        ),
      ),
    );
  }
}