Assembly Language Introduction
Assembly Language Introduction; MASM configuration; Usage of Dumpregs
Statement Purpose:
Will give you practical demonstration of how to setup Visual Studio so that assembly language programs would be written. You will identify each and every option relevant to Assembler. You will also write simple Assembly language programs and run them in debug mode. Also setting the environment to run 16-bit applications will be practices.
Activity Outcomes:
This lab teaches you the following topics:
- Understand
- Making Basic Settings for Visual Studio ‘s Assembler
- Running the program in Visual Studio Debugging Mode
- Understanding breakpoints and memory
- 16-bits
Instructor Note:
As pre-lab activity, read Chapter 3 from the book (Assembly Language for X86 processors, KIP
- IRVINE., 7th Edition (2015), Pearson), and also as given by your theory instructor.
Introduction
You will set up the MS visual Studio VC++ to check various commands, tools, and options available to help you write Assembly Language programs. Also you will start writing basic programs in Assembly Language and get understanding of various data types and operators along with basic data movement instructions.
Lab Activities:
Activity 1:
First, you must install Visual Studio 2010 and select the VC++ language option.
Note: In Lab it will be installed already.
VS 2010 and Visual C++ 2010 Express both include the current version of the Microsoft Assembler.
Verify that the Microsoft Assembler is installed by looking for the file ml.exe in the \vc\bin folder of your Visual Studio installation directory.
The latest copy of the book’s link libraries and example programs have been copied to the c:\Irvine folder. Check them out.
Solution:
Check that the following files are copied into the c:\Irvine directory: You can also see Desktop copy as well.
| Filename | Description |
| cmd.exe | Shortcut to the Windows command-line interpreter (named cmd.exe) |
| GraphWin.inc | Include file for writing Windows applications |
| Irvine16.inc | Include file used with the Irvine16 link library (16-bit applications) |
| Irvine16.lib | 16-bit link function library used with this book |
| Irvine32.inc | Include file used with the Irvine32 link library (32-bit applications) |
| Link16.exe | 16-bit linker |
| Irvine32.lib | 32-bit link function library used with this book |
| User32.lib | Basic I/O link library |
| Macros.inc | Include file containing macros (explained in Chapter 10) |
| SmallWin.inc | Small-sized include file, used by Irvine32.inc |
| make16.bat | Batch file for building 16-bit applications |
| VirtualKeys.inc | Keyboard code definitions file, used by Irvine32.inc |
A subdirectory named Examples will contain all the example programs shown in the book, as well as all the source code for the book’s 16- and 32-bit link libraries.
Activity 2:
Example shows how to perform the following steps.
- Add ‘Start without Debugging’ button in Debug
- Set Tab size to 5 for all
- Building the sample Assembly Language
Solution:
Adding button:
It’s very useful to run programs without having to debug them. To do that, you will want to add a new command to the Debug menu: Start Without Debugging. Here’s how to do it:
- From the Tools, menu, select Customize.
- Select the Commands
- Select Menu bar (radiobutton).
- Click the Add Command
- Select Debug from the Categories
- Select Start Without Debugging in the right-hand list
- Click the OK
- Click the Close
In fact, you can use the same sequence to customize any of the menus and toolbars in Visual Studio.
Setting Tab size for all Languages:
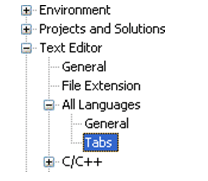
Start Visual Studio, and select Options from the Tools menu. Select Text Editor, Select All Languages, and select Tabs:

Set the Tab Size and Indent Size to 5. Building Sample Assembly Language Program
Visual Studio and Visual Studio Express require assembly language source files to belong to a project, which is a kind of container. A project holds configuration information such as the locations of the assembler, linker, and required libraries. A project has its own folder, and it holds the names and locations of all files belonging to it. We have created a sample project folder in the c:\Irvine\cxamples\ch03 directory, and its name is Project.
Do the following steps, in order:
- Start Visual
- First you will open an existing Visual Studio project file. If you’re using Visual Studio, select Open Project from the File menu. Or, if you’re using Visual Studio Express, select Open, and select Project/Solution.
- Navigate to the Desktop\Irvine\Examples\ch03 folder and open the file named sln.
- In the Solution Explorer window, you will see the word Project. This is the name of a Visual Studio project.
- Click the small + sign and you will see assembly template file named main.asm Double click to open it. If main.asm is not there then you need to add it to the To do that, right-click on Project, select Add, select Existing Item, select main.asm, and click the Add button to close the dialog window. (You can use this sequence of commands in the future to add any asm file into a project.)
- Next, you will open the asm file for editing. Double-click the file named main.asm to open it in the editing window. (Visual Studio users may see a popup dialog asking for the encoding method used in the asm file. just click the OK button to continue.)
Main.asm is the file you will open every time because it is a template file ad you will change it again and again for each program you will write.nae will remain the same
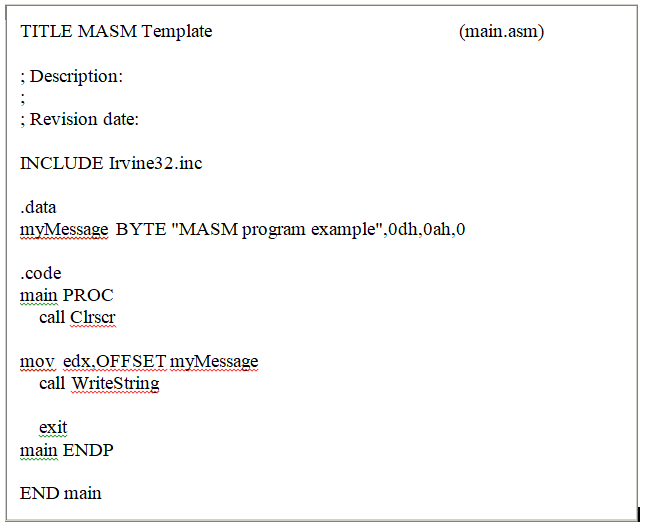
Main.asm displays a message on screen (just to show you how assembly language looks like)

You should see the following program (main.asm file) in the editor window it is an
Assembly Language program you will change for each program you will write (so it acts as template file also)
What is in it will be clarified when you will start learning assembly from next class, here purpose is to show you a program and determines how to compile (For Assembly it is called Assemble/Build) it and Run it.
Note: Every program can be run in two ways. Run and Debug mode. You should be able to run it in both ways.

Later, we’ll show you how to copy this program and use it as a starting point to write your own
programs.
Activity 3:
The example shows how to build and run the program of Assembly. You will need to perform two steps
Build the Program
Now program is open in Editor, will build (assemble and link) the program. Select Build Project from the Build menu. In the Output window for Visual Studio at the bottom of the screen, you should see messages similar to the following, indicating the build progress:

If you do not see these messages, the project has probably not been modified since it was last
built. No problem–just select Rebuild Project from the Build menu. Run the Program
Select Debug àStart without Debugging from the Debug menu.
Note: This button was added by you o start and now it will be used to run the program. If you do not see this button, Click ToolsàSettingsàExpert settings
The following console window should appear, although your window will be larger than the one shown here:

The “Press any key to continue…” message is automatically generated by Visual Studio. Congratulations, you have just run your first Assembly Language program.
Press any key to close the Console window.

Activity 4:
Here it is demonstrated how to run the program in Debug mode and how to setup breakpoints and see Register and memory contents in Debug mode
Solution
There are two ways.
- Just after the successful Build, Press F10 key from keyboard, an arrow will appear in front of the first line that will be run when you will press F10 button again. This process will continue and program will run line by At each line you should be able to see the results in
- Console window (if input/output was done)
- Registers window(if results are in registers)
- Memory window (if results are in variables)
- Watch window (single point of contact to see variables/registers of your own choice)
For our sample program, steps will be
- To begin stepping through your program in Debug mode, press the F10
- A yellow arrow will appear next to the first program statement (call Clrscr).The arrow indicates that the statement is next to be
- Press the F10 key (called Step Over) to execute the current statement. Continue pressing F10 until the program is about to execute the exit
- A small black window icon should appear on your Windows status bar. Open it and look at the contents of the Command window. You should see the words “MASM program example” in the
- Press F10 one more time to end the
- Second way to run in Debug mode is by setting break point at any point inside the sample Then you will use the Visual C++ debugger to step through the program’s execution one statement at a time. (coming next)
Registers
If you want to display the CPU registers any point when program is in Debug Mode , do the following:
Select Windows from the Debug menu. Select Registers from the drop-down list. The bottom window will display the register contents. Right click this window and check the item Flags to enable the display of conditional flags.
You can interrupt a debugging session at any time by selecting Stop Debugging from the Debug menu. You can do the same by clicking the blue square button on the toolbar. To remove a breakpoint from the program, click on the red dot so that it disappears.
Setting a Break-Point
If you set a breakpoint in a program, you can use the debugger to execute the program a full speed (more or less) until it reaches the breakpoint. At that point, the debugger drops into single- step mode.
- Click the mouse along the border to the left of the call WriteString statement. A large red dot should appear in the margin (it is breakpoint) or you can place the cursor to left and press F9, breakpoint will be F9is toggle key.
- Select Start Debugging from the Debug menu. The program should run, and pause on the line with the breakpoint, showing the same Yellow arrow as
- Press F10 until the program finishes (by method # 1)
You can remove a breakpoint by clicking its red dot with the mouse. Take a few minutes to experiment with the Debug menu commands. Set more breakpoints and run the program again. For the time being, you can use the F11 key to step through the program in the same way the F10 key did.
Activity 5:
Here your will set the Visual Studio so that you would be able to build and run 16-bits applications.
Solution
1) Create and Build 16-Bit ASM command.
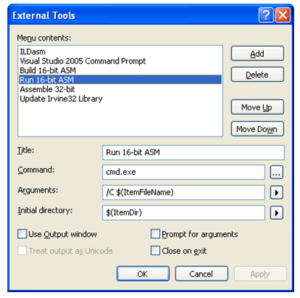
Click the Add button and fill in the Title, Command, Arguments, and Initial directory fields as shown in the screen snapshot. If you click the buttons with arrows on the right side of the Arguments and Initial directory fields, a convenient list appears. You can select an item without having to worry about spelling:


Click the Apply button to save the command and Create the Run 16-bit ASM Command.
Click the Add button again, and create a new command named Run 16-bit ASM:

Click the OK button to save the command and close the External Tools dialog.
Home Activities:
Perform the following at your home PC and write down the details of various options.
- Assuming that our sample project is still open, select Project Properties from the Project Expand the entry under Configuration Properties. Then expand the entry named Microsoft Macro Assembler. Write each option name and purpose you see here.
- Click the entry named General under Microsoft Macro Assembler . Notice that the Include Paths option has been set to the c:\Irvine directory. This tells the assembler where to find files having a filename extension of “.inc”. see the sample and describe details of each options listed here.
- Next, select the Listing File entry, also in the Microsoft Macro Assembler group. Notice that the Assembled Code Listing File entry (shown below) has been assigned a macro name (starting with $) that identifies the name of the source input file, with a file extension of .lst. So, if your program were named main.asm, the listing file would be named lst. See other options listed here and give details.
- Find the Linker entry under Configuration Properties. Select the Input entry, and notice that two filenames have been added to the Additional Dependencies entry. The user32.lib file is a standard MS-Windows file. The irvine32.lib file is the link library file supplied with this book. There must be at least one space separating the file names:
o Next, select Linker under Configuration Properties, and then select General. The Additional Library Directories option equals c:\Irvine, so the linker can find the Irvine32.lib library file. Also Select Linker under the Configuration Properties and select Debugging. Notice that the Generate DebugInfo option is set to Yes. Write down details of each option as well.

