GUI Design – 1
The purpose of this lab is to make students learn the vocabulary of graphical interaction, basic interaction tasks, pros and cons of various graphical control elements so that student can make well informed design choices when designing interfaces.
Outcomes
After completing this lab, students will be able to:
- Figure out the suitable graphical controls to be used in their application’s interface
Introduction
As a designer, it is indispensable for you to have an understanding of different graphical control at your disposal so that you can make well informed decision when designing interfaces. In this lab, you will get to know different interaction task that can be performed when interacting with a graphical user interface, which graphical controls can be used to perform each of these interaction tasks, and pros and cons of these controls.
In this lab, we will often use Windows operating system and Microsoft Word to demonstrate how these basic interaction tasks, to be discussed in each of the following activities, are being performed and if they have been implemented well.
Activity 1: Get to Know Input tasks
These tasks are performed to provide some information to the system that it does not already have.
Text field: Text field is used to take text input from user.
Slider: In case a value from user is required, slider can be used. Slider though has an inherent issue when larger range is mapped onto it. Since slider has limited resolution, so in case the range, which a slider covers, is large, it would not be possible to select every single value using the slider.
Pointing: Point and click can be used to take 2D points as input from user. For example, to draw a rectangle two points are needed (top left, bottom right). Point and click can be very useful in this case. The pointer position on the screen when a click button is pressed can provide us the coordinates.
Pointing can also be used to take path as input from user.
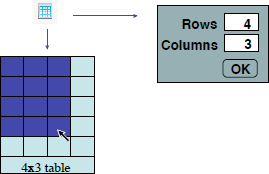
We can also adapt interaction to the type of value that is required as input. Figure illustrate an adaptive interaction to take number of rows and columns as input.

Activity 2: Get to Know Selection tasks
These tasks are performed to select one or several items within a set.
The set size can be fixed or variable. To select item(s) from a fixed size set, we may use menu, radio buttons and check boxes. Menu and radio buttons are used when single item selection is required while check boxes are used when there is a need to select several items. For large fixed set size, we can use list.
For a variable-size set, we can use adjustable list and iconic representation. Since a variable size set can be of very large size, to make selection easier it is very important to use text input as prefix to filter the items from list.
Menus
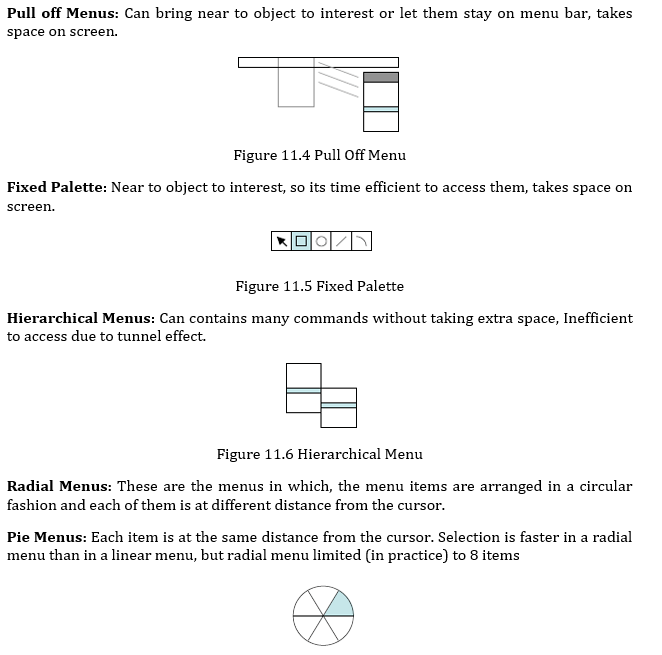
Linear Menus: These are the menus in which, the menu items are aligned in a linear fashion and each of them is at different distance from the cursor. The menu items that are close to the cursor position are more efficient to access compared to those that are far. There are various types of linear menus. Let us discuss each of them.
Menu Bar + Pull down menus: Does not take much space, Difficult to reach them (takes time)

Figure 11.2 Pull Down Menu
Contextual Menus: Near to object to interest so its time efficient to access them, causes occlusion though. Also, there is no feedforward (you need to figure out how to bring them up)
![]()
Figure 11.3 Contextual Menu

Figure 11.7 Pie Menu
Marking Menus: In marking menus, user draws marks to perform selection. The marking menu works in two modes: novice and expert. It has less occlusion compared to pie menus and offers natural transition from novice to expert. It, though, has discoverability issue as there is no feed forward available. Furthermore, if you click to show the menu on the side of the screen, the whole menu will not be visible. It also need, at its backend, a smart gesture recognizer

Figure 11.8 Marking Menu
Activity 3: Trigger tasks
These are the tasks that user performs to tell the system to activate a command.
Menu and Buttons: We often click on menu items and button to trigger the command.
Drag n Drop: Drag n Drop is also used for trigger task. In drag n drop, triggering depend upon the source and destination. For example, a file (source) dragged to a folder (destination) will trigger move command however if the destination is a shortcut to some program, it will trigger the open command and will result into opening the file in that program. The problems associated with drag n drop command is its poor discoverability and to know what is draggable (source + destination) and which destinations accept the dragged source.
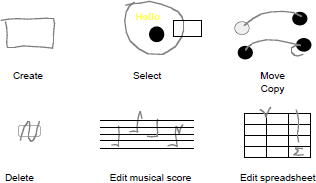
Gesture Input: We can also draw gesture to trigger the command. One of the powerful features it offers is to specify the object and command simultaneously e.g. drawing a rectangle gesture specifies both object (Rectangle) and the command (create). Using gestures to trigger a command need a smart gesture recognizer behind the scene. It also requires user to learn the gesture vocabulary therefore it is very important to design gestures that are quite intuitive.

Figure 11.9 Gesture Input
Activity 4: Navigation tasks
These tasks are performed to change the viewport location or zoom level. Scrollbars
Direct Scrolling Panning and Zooming
Activity 5: Property setting tasks
The tasks are performed to edit/specify the properties/attributes of object of interest. These tasks are normally performed through property inspectors.
Dialog boxes: Temporal and spatial decoupling between the specification of the command, its parameters, and its execution. Mostly, there is nothing else you can do when a dialogue box is open. Problem with Tabs in dialogue box is that we are not sure if OK button is for all the tabs or for a single tab as there is no feedback.
Property boxes / inspectors: Better than dialogue boxes. Always on display, Content of inspector changes and at the same time, it immediately affects the object.
Activity 6: Transformation tasks
These tasks are performed to edit objects of interest by directly manipulating them. They are performed through manipulation handles on the shape object that helps editing them.
Home Activities
For this lab’s assignment, you will work in a group (of your project). In this assignment, you are going to design the interface for your project. The purpose is to use appropriate graphical control elements and to be focused on User interaction and NOT on the implementation of the entire project.
Assignment Deliverables
You need to show the initial version of your project (developed in any relevant tool) containing the appropriate graphical controls.

